In computer science, a linked list is a fundamental data structure that represents a sequence of data elements. Unlike arrays, the order of elements in a linked list is not determined by their physical placement in memory. Instead, each element, known as a node, contains a reference to the next node in the sequence. Reversing a linked list involves changing the direction of these references, resulting in a reversed order of elements. In this tutorial, we will explore how to reverse a linked list in C# and cover essential concepts along the way.
Table of Contents:
- What is a Linked List?
- Inserting Data into a Linked List
- Reversing a Linked List in C#
- Example: Reverse a Linked List
- Conclusion
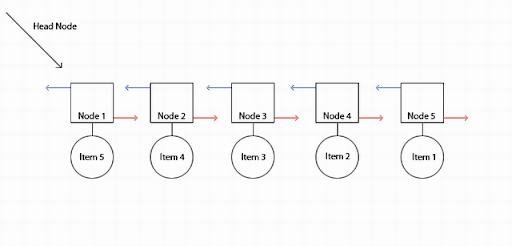
1. What is a Linked List?
A linked list is a linear data structure consisting of nodes that hold data and pointers to the next node in the sequence. Unlike arrays, linked lists can efficiently insert and remove elements at any position. The nodes in a linked list are connected through pointers, forming a chain-like structure. Each node contains the actual data and a pointer to the next node.
2. Inserting Data into a Linked List
To create a linked list, we initialize the head node and assign null to its next pointer. When inserting new elements, we create a new node, assign the data value, and update the pointers accordingly. The tail pointer always points to the last node in the list, allowing for efficient insertion at the end.
Lets consider the following linked list
10->20->30-NULL
then output should be
30->20->10-NULL
3. Reversing a Linked List in C#
Reversing a linked list involves changing the direction of the pointers, effectively reversing the order of the elements. To achieve this, we maintain three pointers: current, previous, and next. Starting from the head, we iterate through the list, updating the pointers as follows:
- Set
nextto the next node in the sequence. - Update
current's next pointer to point to thepreviousnode. - Move
previousandcurrentone step forward by assigningcurrenttopreviousandnexttocurrent.
By the end of the iteration, the previous pointer will be pointing to the original last node, which becomes the new head of the reversed list.
4. Example: Reverse a Linked List
Let’s consider a linked list with the following elements: 10->20->30->NULL. We will demonstrate how to reverse this list using the C# programming language. Below is the example code:
using System;
using System.Collections.Generic;
using System.Linq;
using System.Text;
using System.Threading.Tasks;

namespace Algo
{
    public class List
    {
        public List Next { get; set; }
        public int Value { get; set; }
        public List(int value)
        {
            Value = value;
        }
        public override string ToString()
        {
            List current = this;
            StringBuilder builder = new StringBuilder();
            while (current!=null)
            {
                builder.Append(current.Value + "->");
                current = current.Next;
            }
            return builder.ToString();
        }
        public List ReverseList()
        {
            List prev = null;
            List next = null;
            List current = this;
            while (current!=null)
            {
                next = current.Next;
                current.Next = prev;
                prev = current;
                current = next;
            }
            return prev;
        }
    }
    class Program
    {
        static void Main(string[] args)
        {
            List list = new List(10);
            list.Next = new List(20);
            list.Next.Next = new List(30);
            Console.WriteLine(list);
            var rev = list.ReverseList();
            Console.WriteLine(rev);
        }
    }
}
5. Conclusion
In this tutorial, we explored the concept of linked lists and learned how to reverse a linked list in C#. Reversing a linked list involves manipulating the pointers to change the order of the elements. By following the example and understanding the provided code, you can apply this knowledge to other linked list operations or similar data structures. Linked lists are essential in coding interviews, and understanding their operations can enhance your problem-solving skills.
Remember to practice implementing and manipulating linked lists to strengthen your understanding of the concepts discussed in this tutorial. Happy coding! 😊